Do you want to use Google Analytics to track your affiliate sales referrals so that your research and optimization strategies are confined to one tool? Look no further, I’m going to talk about how you can do exactly this!
In this tutorial, I’m going to show you how to analyze the clicks to the affiliate links on your blog to understand which links have the greatest impact, what blog posts are driving the most affiliate referrals, and the ability to assign a monetary value (that you’ve approximated) to affiliate links that are clicked on your blog so you can estimate your earnings based on traffic.
This year, I’m trying to up my game as a blogger by doing more affiliate marketing. Affiliate marketing is the business of providing value via your website while also promoting products and making a commission off of selling and promoting those products. Obviously, as a reader, you don’t pay a penny more when you purchase a product off of my blog.
This is a three part tutorial that requires you to use Google Analytics and Google Tag Manager. With this tutorial, I am assuming that you already have a high level understanding of Google Analytics and can navigate within it at a very basic level.
What is Google Tag Manager?
First, you are probably wondering what Google Tag Manager is and why it’s needed for tracking referral sales in Google Analytics. Again, I’m assuming that if you are reading this, you are a blogger (lifestyle, food, fashion, home decor and parenting genre) and have some idea of how to navigate Google’s tools.
Think of Google Tag Manager as a bucket that holds all of your tracking codes (and has the ability to do a whole heck of a lot more). If you are part of blogging networks like Activate, Collective Bias, Massive Sway and BlogHer, they have probably asked you to embed a little snippet of code into your header tag. If you have a campaign with them or are competing/applying for a campaign with them, these codes then provide those networks insight into measuring your overall blog traffic, visitor behavior and other campaign statistics (if you get chosen for one). This snippet of code adds additional lines to your header in your blog, which then has the potential to slow down your blog.
The benefit of using Google Tag Manager for your blog is that it will allow you to manage ALL of these snippets of code all in one place. It also provides a change control/version control log. For example, if you decide that you want to no longer be part of a blogging network, you can just go into Google Tag Manager and remove that tag rather than searching into your header file to find the code. There are definitely more benefits to using Google Tag Manager that you can read about here.
How can Google Tag Manager help me with affiliate sales?
One of the things I’ve discovered is that Google Tag Manager has the ability to capture interactions WITHIN your blog .
If you are doing affiliate sales now, you are probably using the affiliate network’s embedded reporting system. That probably means that for every affiliate network you are part of, you are logging in multiple websites to review what blog posts are doing the best in terms of traffic for that particular affiliate and what products are being clicked on from your blog. With Google Tag Manager, you can set up what Google’s event tracking mechanism to track outbound link clicks from your blog.
For example, if a user clicks on an Amazon link, you can track the details such as:
- what blog post it was clicked from
- the link to the specific product was clicked on
- number of times it was clicked on
- number of links from a particular affiliate
- number of lead magnets/opt-ins users have signed up for
One of the things that I’ve found most useful is having a high level overview of the number of times a link was clicked from a certain shop that I promote. After that, you can drill down and set up as much detail as you want.
I’m going to show you at a basic level how to set it up. With this tutorial, the end result won’t show you the actual revenue of what was generated, what it can tell you is an estimation/goal based on your traffic.
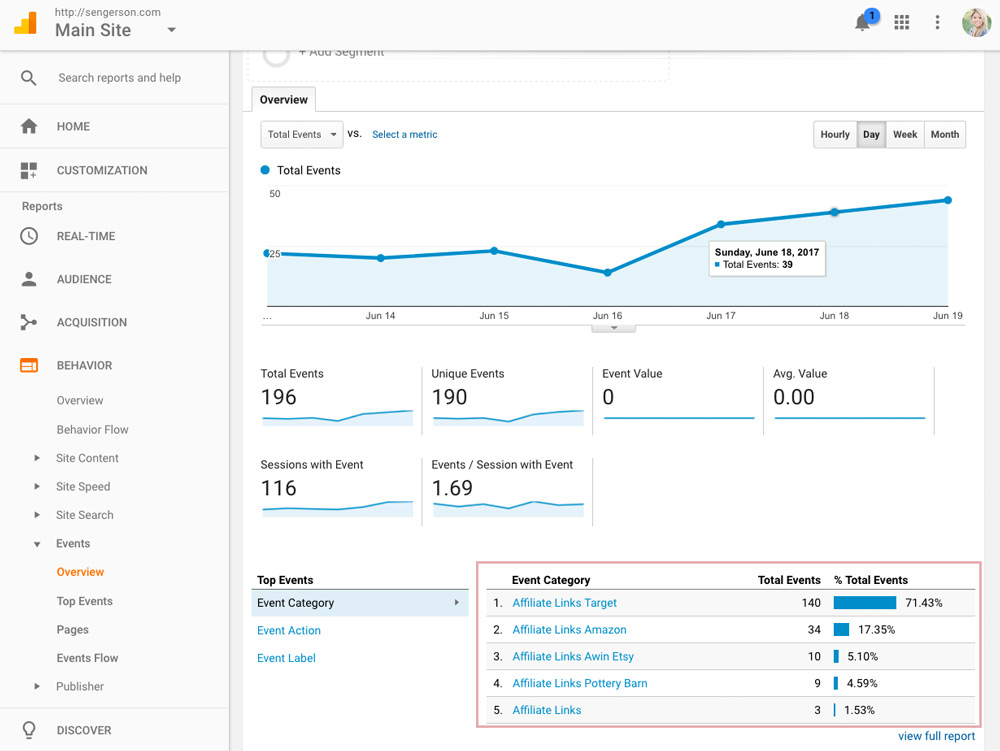
For example, after setting everything up using the tutorial below, the screenshot below shows the number of times in my given date range the outbound clicks that were completed in Google Analytics (under Google Analytics > Behavior > Events > Overview).
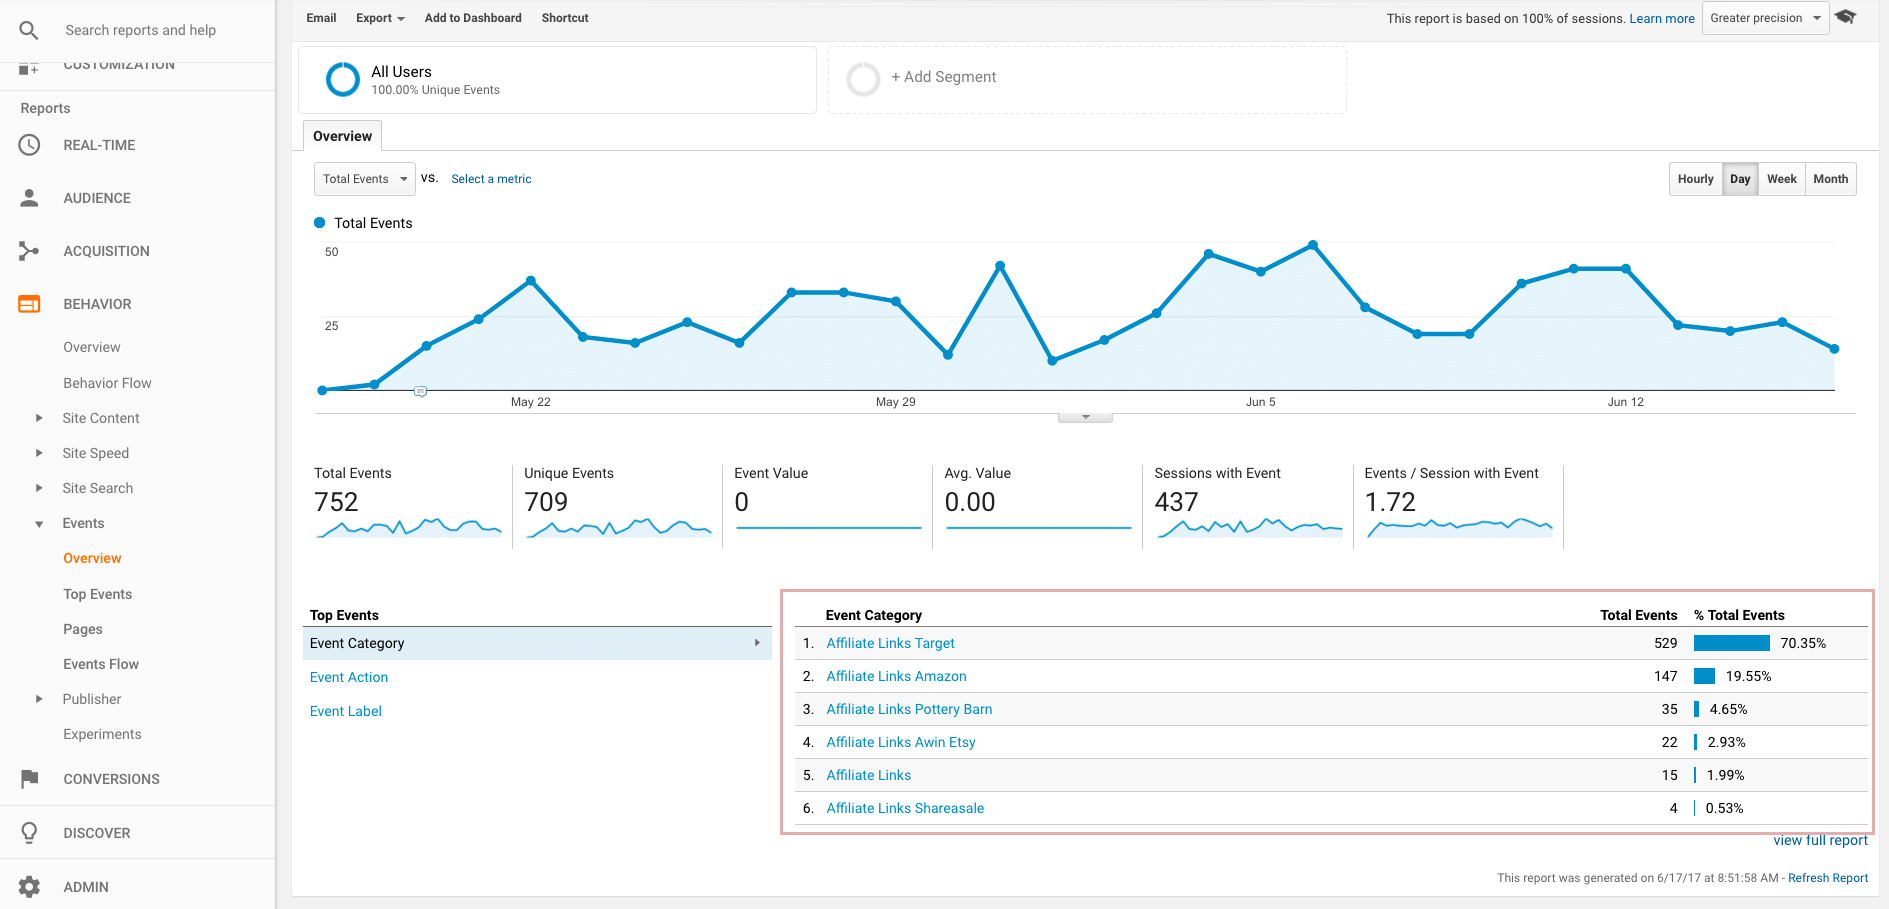
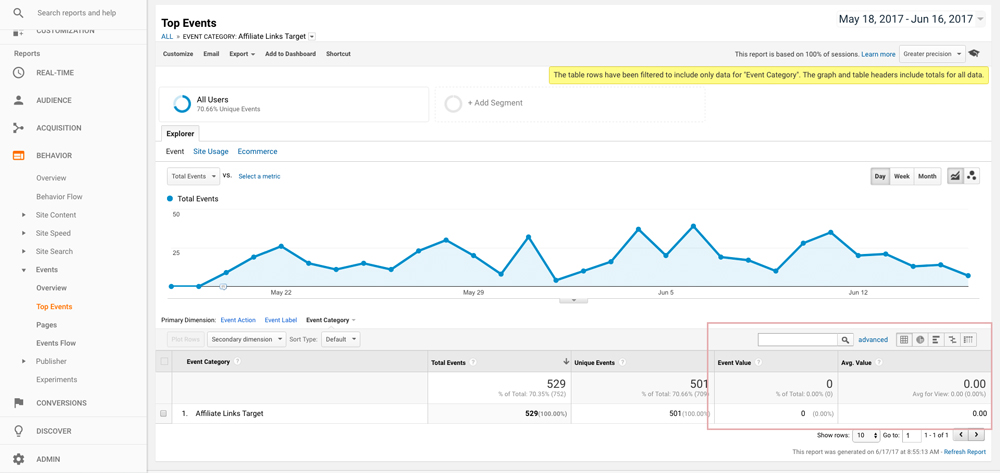
If I click on any of those Event Categories, I can set up Goals in the area below. What this section has the potential to do is provide you an estimation/projection of how much you should have made based on the traffic you received.
This tutorial is broken into three parts and I’ve also included a resource page near the end of the post so that you know where I gathered all of my information. I hope this helps you on our journey to increasing your affiliate sales!
Phase A – Setting Up Google Analytics with Google Tag Manager
Step 1 – Sign Up For Google Tag Manager
It’s easy to do. Just sign up like you did for Google Analytics here. This will also walk you through setting up Google Tag Manager’s tracking code on your blog as well. See this tutorial for how to install and setup Google Tag Manager once you sign up.
Step 2 – Understand the Navigation
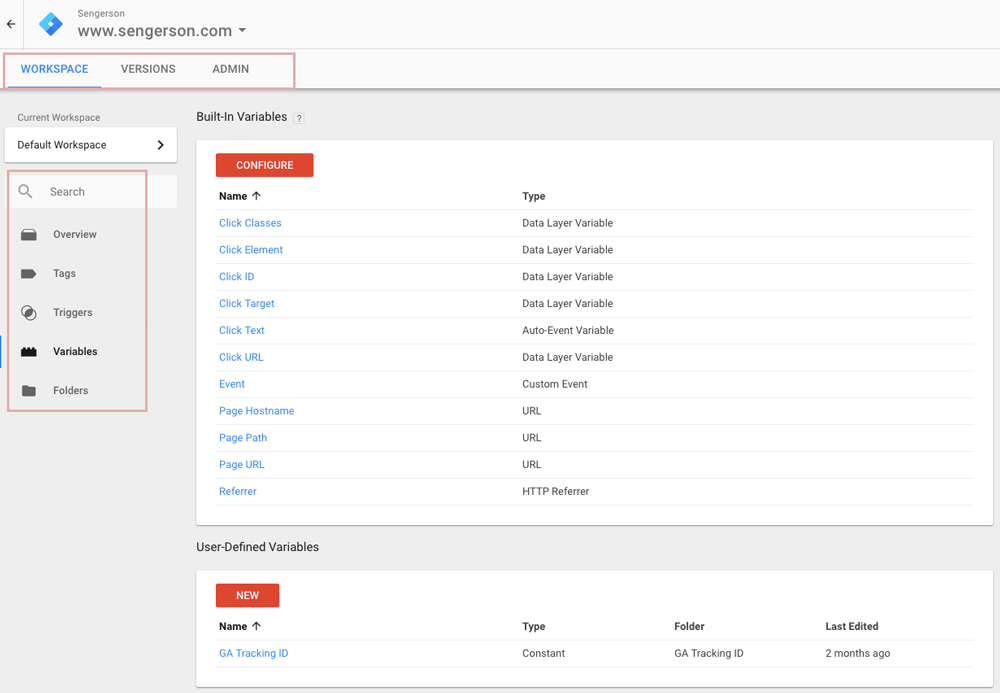
Google Tag Manager has a similar user interface to Google Analytics. There is menu navigation on the top and the left of the screen.
Step 3 – Swap Your Blog Header’s Google Analytics code with Google Tag Manager code
You are going to swap out your Google Analytics code with your Google Tag Manager code. Just remember that Google Tag Manager acts like a bucket. Google Analytics is something you would “add” to that bucket. You probably have your Google Analytics code embedded already in your header.
I would recommend taking the Google Analytics code OUT of your header and instead adding it to the Google Tag Manager “bucket” as what they call a tag.
For each of the blog networks that you have snippets of code in the header for, you would also add each of those as tags. That way, you only have the Google Tag Manager code in your header, which will in turn provide a slight efficiency for how fast your blog will load.
In short, you’ll be replacing your Google Analytics code for your Google Tag Manager code. I’ll show you how in the next steps.
Step 4 – Create a Variable for Your Google Analytics Code
In Google Tag Manager > Variables > User-Defined Variables click on New. Name this GA Tracking ID. Set it as a Constant variable. The value of it should be your Google Analytics code (which you can get from Google Analytics – it should have this format UA-XXXXXXXX-X).

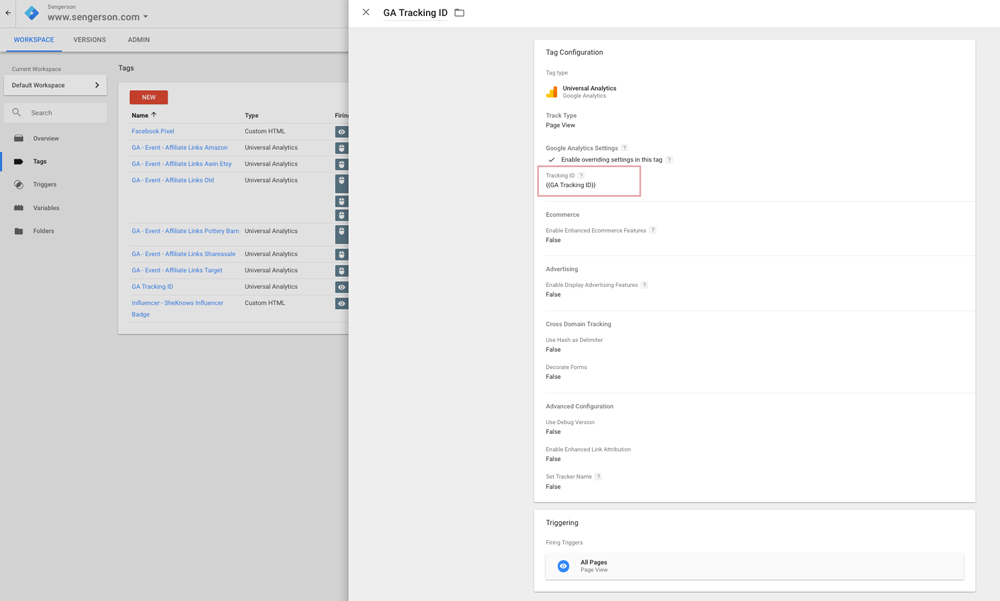
Step 5 – Create a Tag for Your Google Analytics Code
Next, you’ll want to add a tag for your Google Analytics code in Google Tag Manager. The reason: since you’ll have the Google Tag Manager code in your header, this will code will then in the background call your Google Analytics code that will then measure your traffic.
In Google Tag Manager > Tags > New. Set it up like below. Notice the area that I highlighted should be what you named your variable from Step 4 – if you followed my directions, you should have the same variable as the image below.
Phase B – Set Up Affiliate Link Tracking
This section will show you how to set up what Google calls event tracking. Most of the work is done in Google Tag Manager, but the results and analytics will be in Google Analytics.
I will be walking you through how to track outbound clicks from a specific affiliate network/shop.The example I will use is Skim Links. You can follow the steps to track affiliate link clicks to other places such as Amazon, Impact Radius, Link Share and Commission Junction.
At the end of this section, one of the basic things you will accomplish is using Google Analytics to see the number of clicks from your blog to that specific affiliate network as well as what blog posts are generating the most clicks to that affiliate link.
Step 1 – Create a Tag
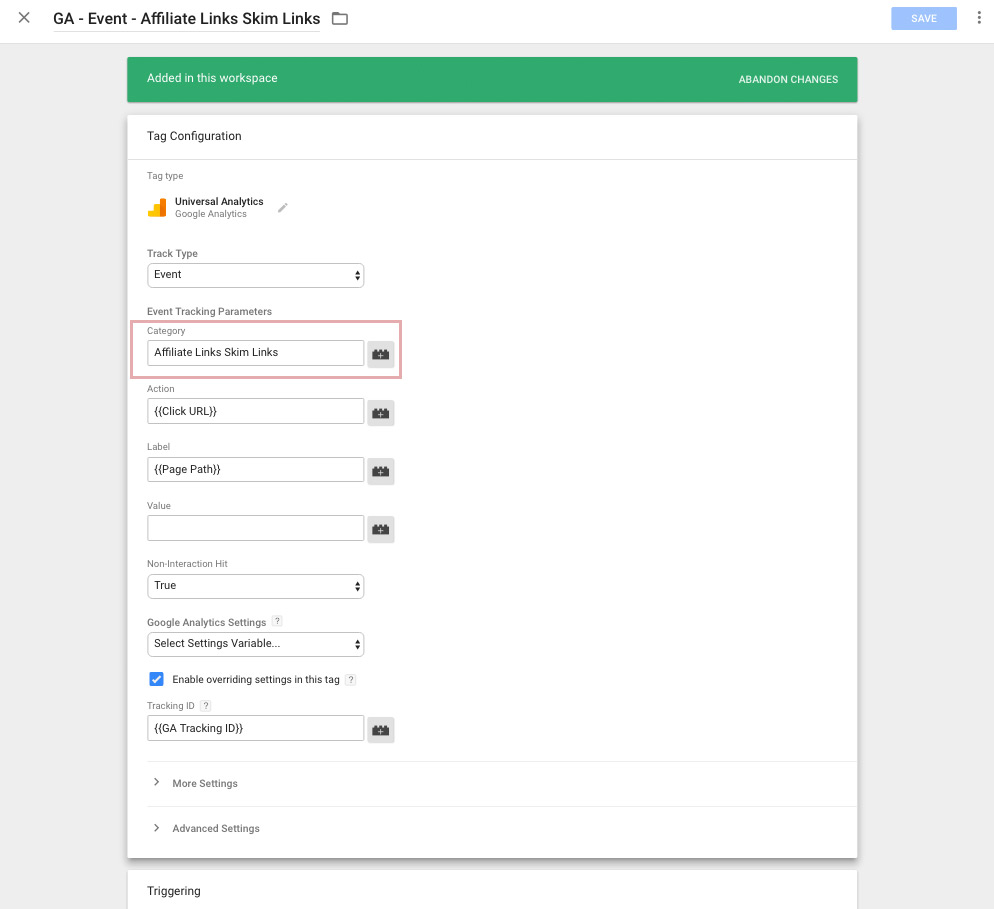
First, you will want to create a tag for your affiliate network. In Google Tag Manager, under tag click New. I would recommend naming it GA – Event – Affiliate Links XXXX. XXXX represents the name of the affiliate you are creating the link for. For this example, I’m calling mine GA – Event Affiliate Links Skim Links. Use this format for now because it will be much clearer to you how they relate as we progress in the tutorial.
For the category, note that this will be what is displayed in Google Analytics. You need to name it something like “Affiliate Links XXXX” where XXXX represents the affiliate network.
For the Tracking ID, this should be the variable that you created in Part A.
This is how I’ve set mine up. For now, just ignore the Triggering section.
Step 3 – Create a Trigger
Next, in the left navigation of Google Tag Manager, click on New. You will want to set up a Trigger called Affiliate Click – XXXX. I’ve called mine Affiliate Click – Skim Links.
In the Page URL field, make sure you put YOUR main domain URL (mine is www.domain.com).
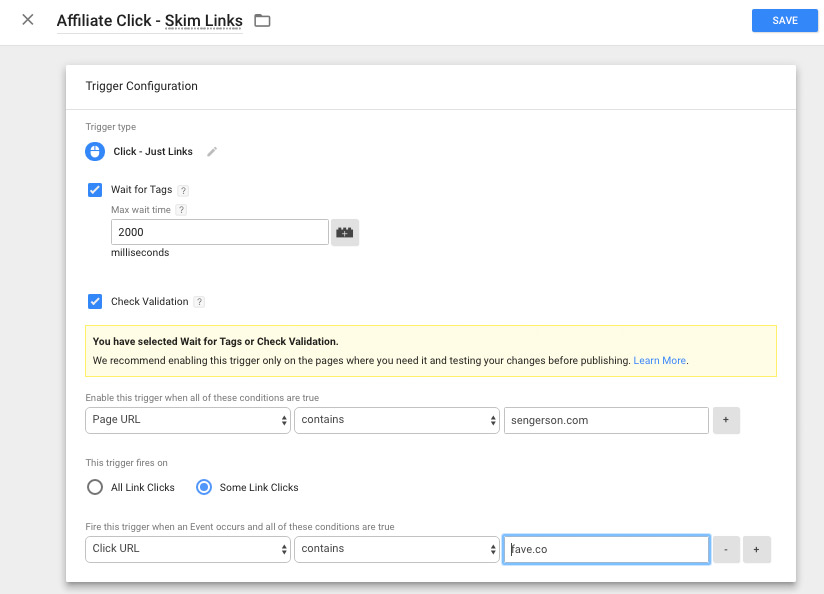
In the Trigger Fires On field, this is where you’ll need to do some investigation for your specific affiliate network. Most affiliate networks have a certain link structure. So you’ll want to put the first part of the URL that is typically constant in that field. For example, Amazon is typically “amzn.to” and Skimlinks is typically “fave.co”.
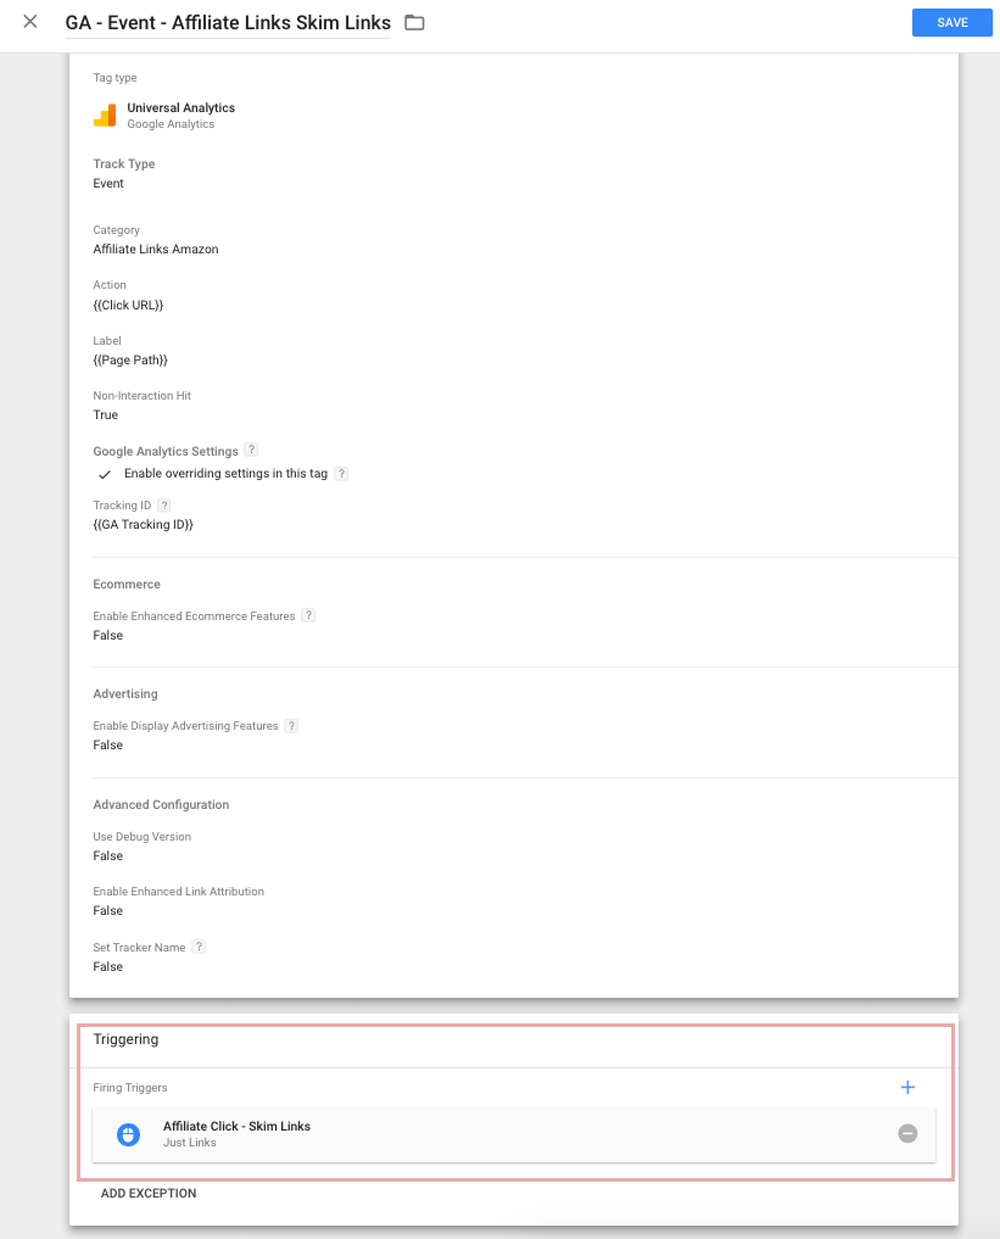
Step 3 – Go Back to Your Tag and Add the Trigger
On the left navigation, go to Tags and click on GA – Event – Affiliate Links XXXX (what you created in Step 1).
Scroll down to Triggering and add your trigger that you created in Step 2 which should be called Affiliate Click – XXXX.
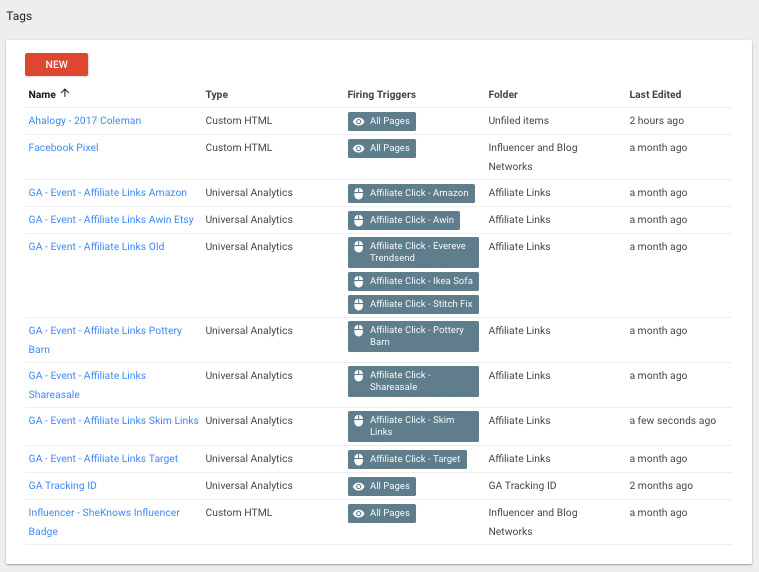
Step 4 – Repeat for All Affiliate Networks
Repeat the steps in Part B for all the affiliate networks you want to start tracking. As an example, below are all the affiliate networks that I am a part of that I track.
Re-marketing Pixels
You’ll notice I have a Facebook Pixel (a totally different conversation) that I also include in Google Tag Manager. This is outside the scope of this post. But, in case you are curious, what a Facebook Pixel does is allow you to track people that go to your website that are logged into Facebook while browsing your website – and allows you to “remarket” to them.
For example, if you had a post about farmhouse decor with a bunch of affiliate links – and you wanted to run ads on Facebook to people who visited your website, a Facebook pixel will allow you to do that. But that’s another post for another day.
Step 5 | Wait Three Days and Review Google Analytics
Before we go to Part C, I want you to wait three days to make sure that data is now appearing in Google Analytics.
In Google Analytics, on the left navigation, go to Behavior > Events > Overview. The Event Category section will show you the number of clicks based on the duration you chose to that affiliate link! Isn’t that awesome?
Under Top Events, if you select Event Action, you can see what affiliate links were clicked the most. An example of what you could do with this information is to share that specific product with your affiliate link on Facebook because you know that it did well in your blog post.
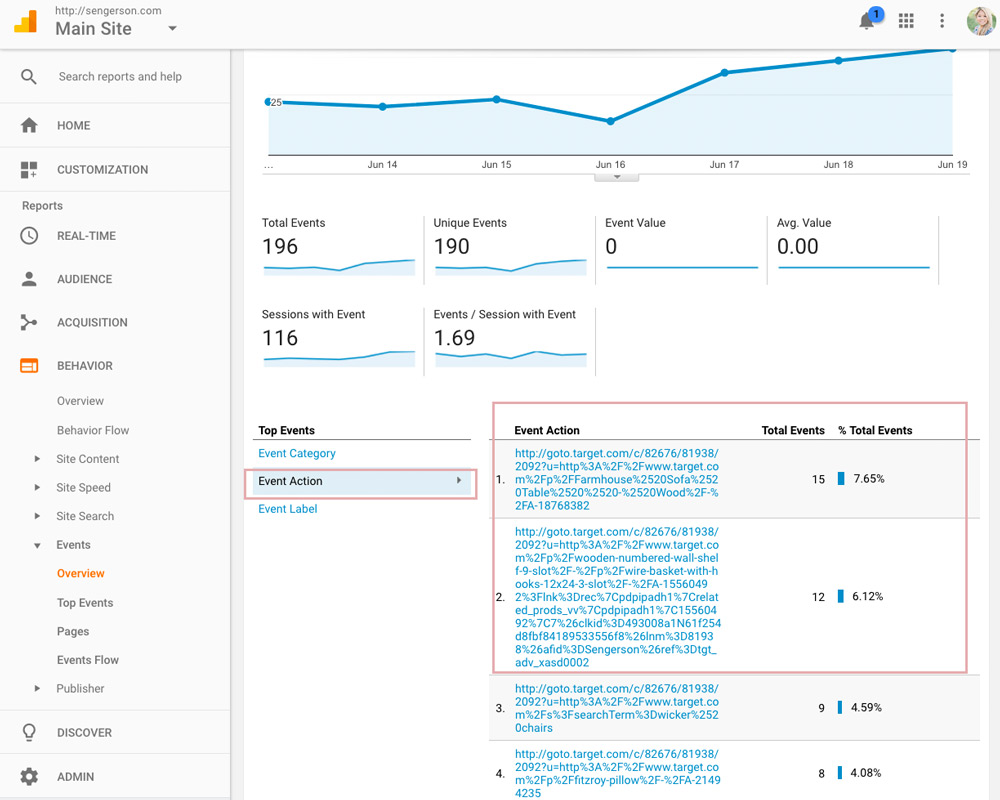
Under the same Events section in the left navigation, you can go to Top Events, Pages, Events Flow for even more information to provide you further data to analyze.
I mostly use this section to understand what links are doing the best in terms of getting people to click. I then use that information to re-market those links on other social platforms because I already know it does well on the blog! That is just scratching the surface of what I could do with this information. I’d love to hear how you would use this information – so comment below – I’d love to learn from you.
Phase 3 – Creating Estimates for Sales (i.e. Goals within Google Analytics)
In this next section, I’m going to show you how you can set what Google Analytics refers to as a goal. You can use a goal, for example, to estimate the affiliate sales that you will receive based off of your traffic. This will allow you to assess “how much” you should be making based on historical traffic and sales. What you need to understand is that this is just ESTIMATES, not actuals.
For example, if you’ve been blogging for a while, let’s say you have 100,000 page views. On average, let’s say you make $500 a month from affiliate links from XXXX network. You can then divide $500 by 100,000 page views. You can estimate that each page view is worth $0.005. While pageviews fluctuate based on month and your blog’s topic, you can at least “estimate” how much you would make based on pageviews.
This will allow you to look back on your blog analytics for any given month or major holiday so that you can understand how much blog traffic you brought in that month. You can then estimate how much you would be able to make if you did the same marketing tactics you did in that month last year.
Setting up goals and attaching monetary value to your blog’s traffic is done in Google Analytics. Note that you can only add up to 20 goals in Google Analytics – so make sure you think about your strategy for tracking more than 20 affiliate link goals.
Step 1 | Go Back Historically and Value the Page Clicks
You’ll need to gather how much you made for a specific affiliate network in the last three months or the last year. For the purposes of this tutorial, I’m going to assume you did it for the last year. My recommendation is to do the last year because it provides a better estimate on how much you made. We are going to call this Value A.
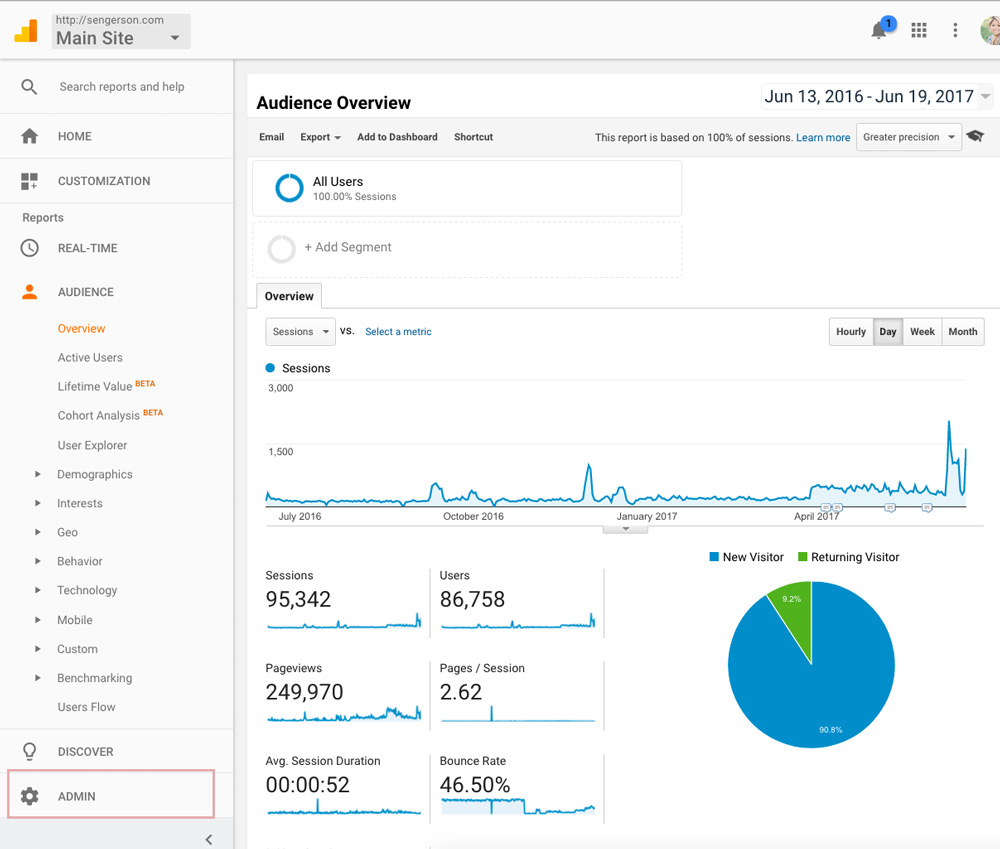
Next, you’ll need to gather the page views from Google Analytics for your website as a whole for that same duration. Let’s make this Value B.
Now calculate: Value A divided by Value B equal Value C. Keep Value C handy. For those math nerds, this is the formula (Value A/Value B = Value C).
For my example, I had 249,970 page views (Value B) and only made $43.22 from Skim Links (Value A) last year. From my calculation of $43.22/249,970, each page view is “worth” about $0.00017290074 (Value C).
Step 2 | Add a Goal
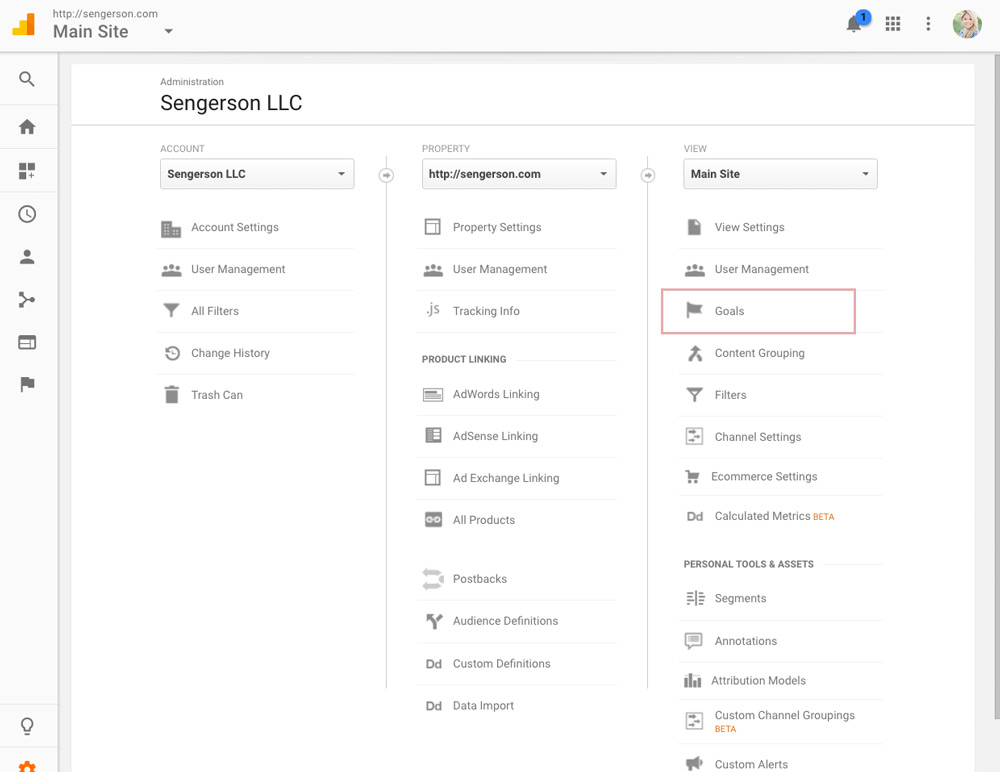
Click on the Admin section (bottom left corner as of this writing).
Under the View column, click on Goals.
Click on +New Goal. Under Goal setup, choose Custom.
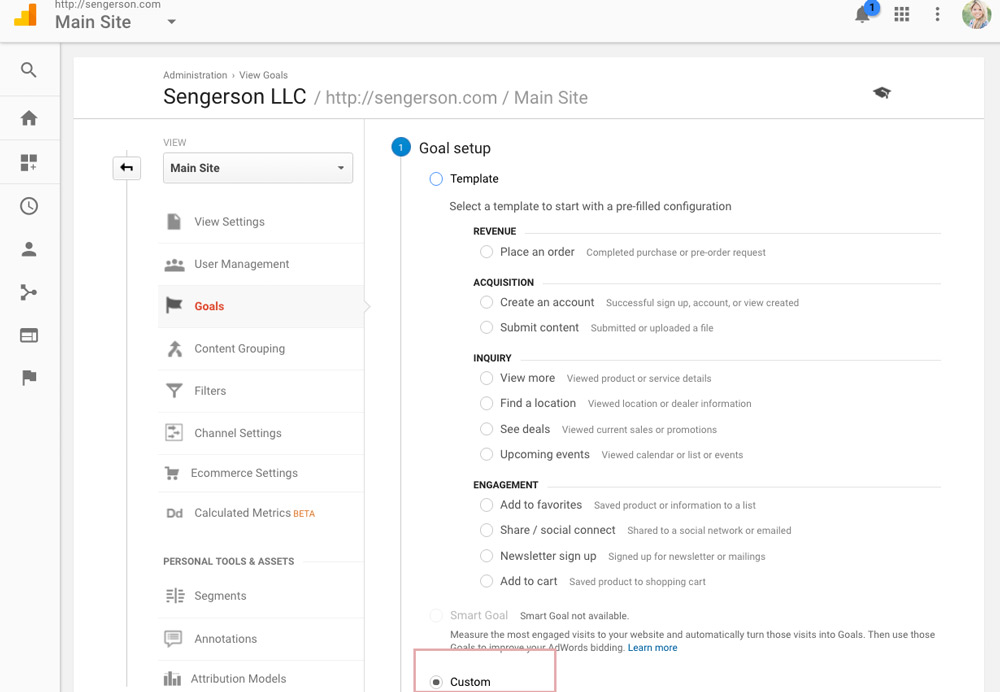
Under Goal Description, name it Affiliate Goal XXXX which is the name of the network. Please note that at the time of this writing, there is no way to delete a goal. However, you ARE able to inactivate it or rename it and modify. Proceed with caution.
Choose Event. Click on Continue.
Next, under Goal details, under Category, put Affiliate Links XXXX in whatever you named it for the Tag Name in Google Tag Manager (this was Part B, Step 1).
Now, under Use the Event value as the Goal Value for the conversion, take your calculation from Step 1 and insert it here. If you waited three days from Part B, there should be data to pull back for this for you to click on Verify.
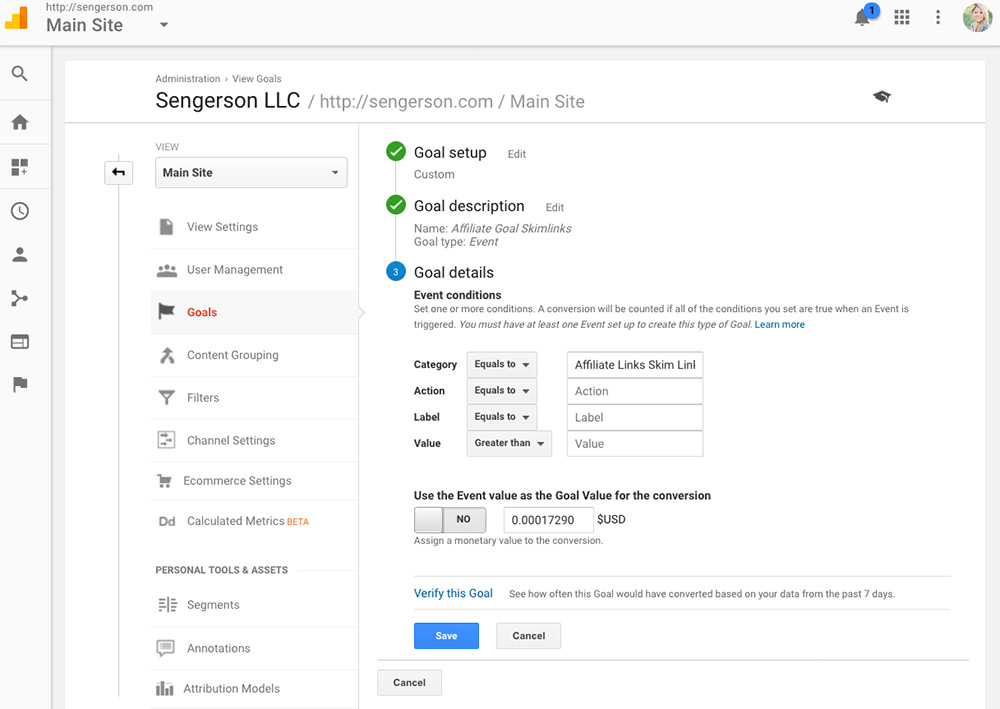
Click on Save.
Step 3 | View Your Data
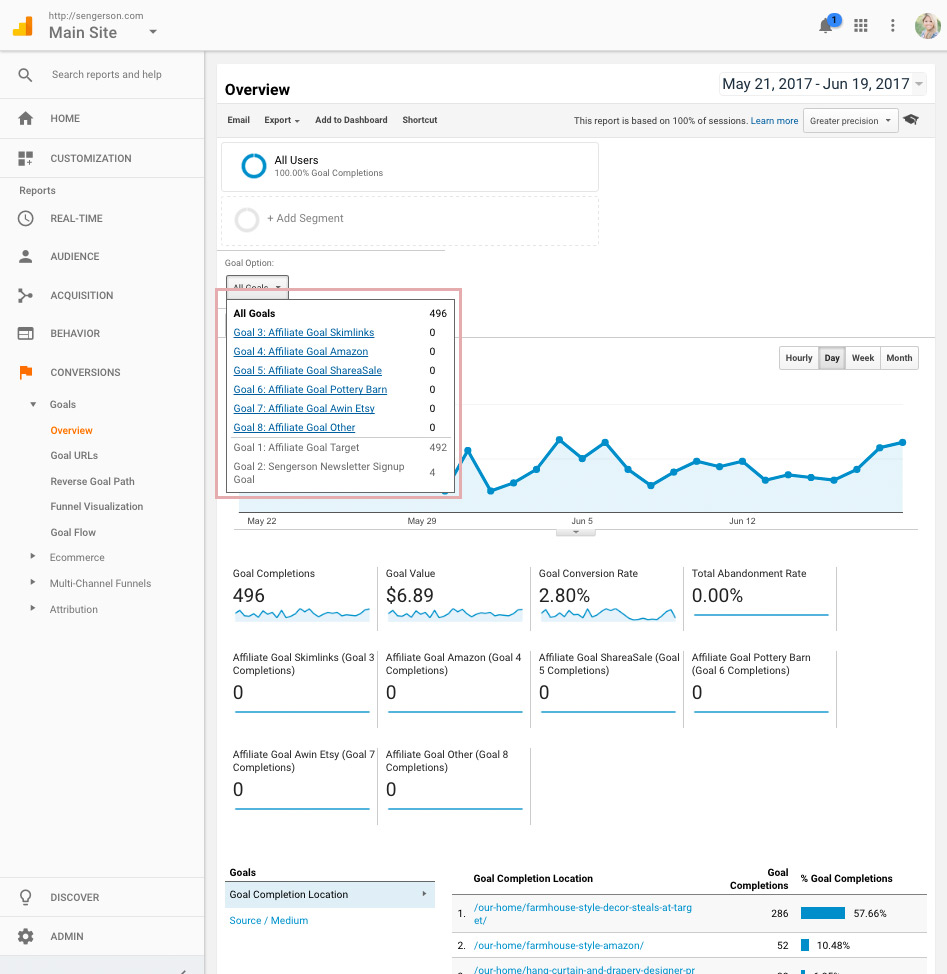
Now, it is time for you to review your data in Google Analytics. Go to Conversions > Overview.
You can see all the data in terms of clicks and the value of those click as well as the Goal Completions (all that means is the number of times the affiliate network link’s were clicked).
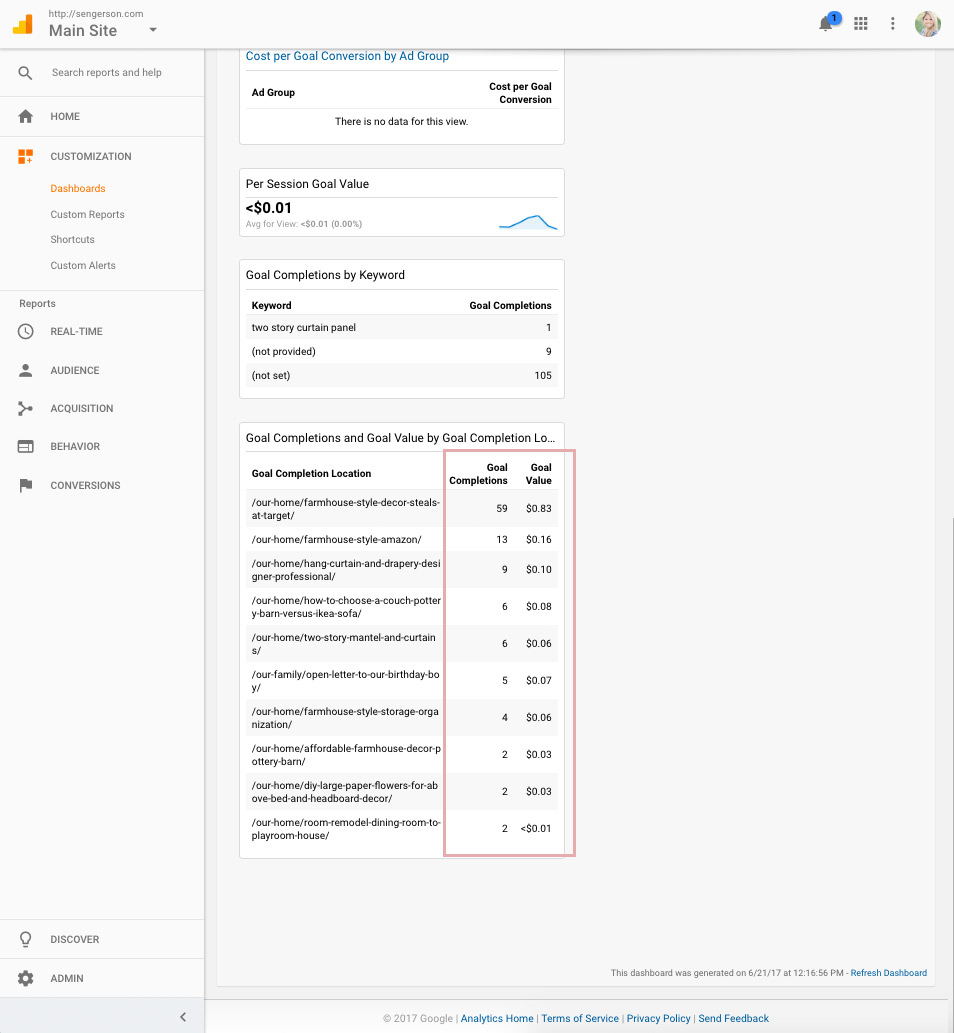
There are loads more ways to analyze this data. What’s even better is that there is an ENTIRE LIBRARY of reports that people have premade that you can use to analyze your OWN data! Its available for anyone to install from the Solutions Gallery. Read more about some of the top reports here. For example, one of the reports I imported provided a small dashboard that provided me a link to where someone clicked on an affiliate link along iwht the estimation of the value of that click.
Resources for Affiliate Marketing for Bloggers
These are all the resources that I used to help me understand how Google Tag Manager and Google Analytics work together. None of them focused specifically on bloggers. Most were also outdated because Google changes their user interface all the time! None the less, I’ve gathered them here for you so that you can see where I got my information.
Websites and Podcasts:
- Social Media Examiner Podcast on Google Tag Manager
- Getting Started with Google Tag Manager
- Guide to Google Tag Assistant
YouTube Video from Measure School:
Summary for AFfiliate LInk Tracking in Google Analytics
In this post, I talked about being able to track your affiliate referrals in Google Analytics with custom event tracking that will allow you to use data and analytics to be able to drive where to focus your efforts.
Just remember though, even though now you’ve set up the ability to report, USE the data to help you focus and determine where your time and effort should be spent.